Tool wall storage can start at a basic adhesive clamp or run to a full plywood sheet you cut yourself, and the only question that matters is whether your wall can take screws or not.
Renters with smooth tile can start and finish tonight; anyone with studs to hit can build a system that outlasts the tools it holds.
Slot spacing matters more than brand name on modular rail, because channels from one brand lock another brand’s hooks out cold.
1. Pegboard Systems
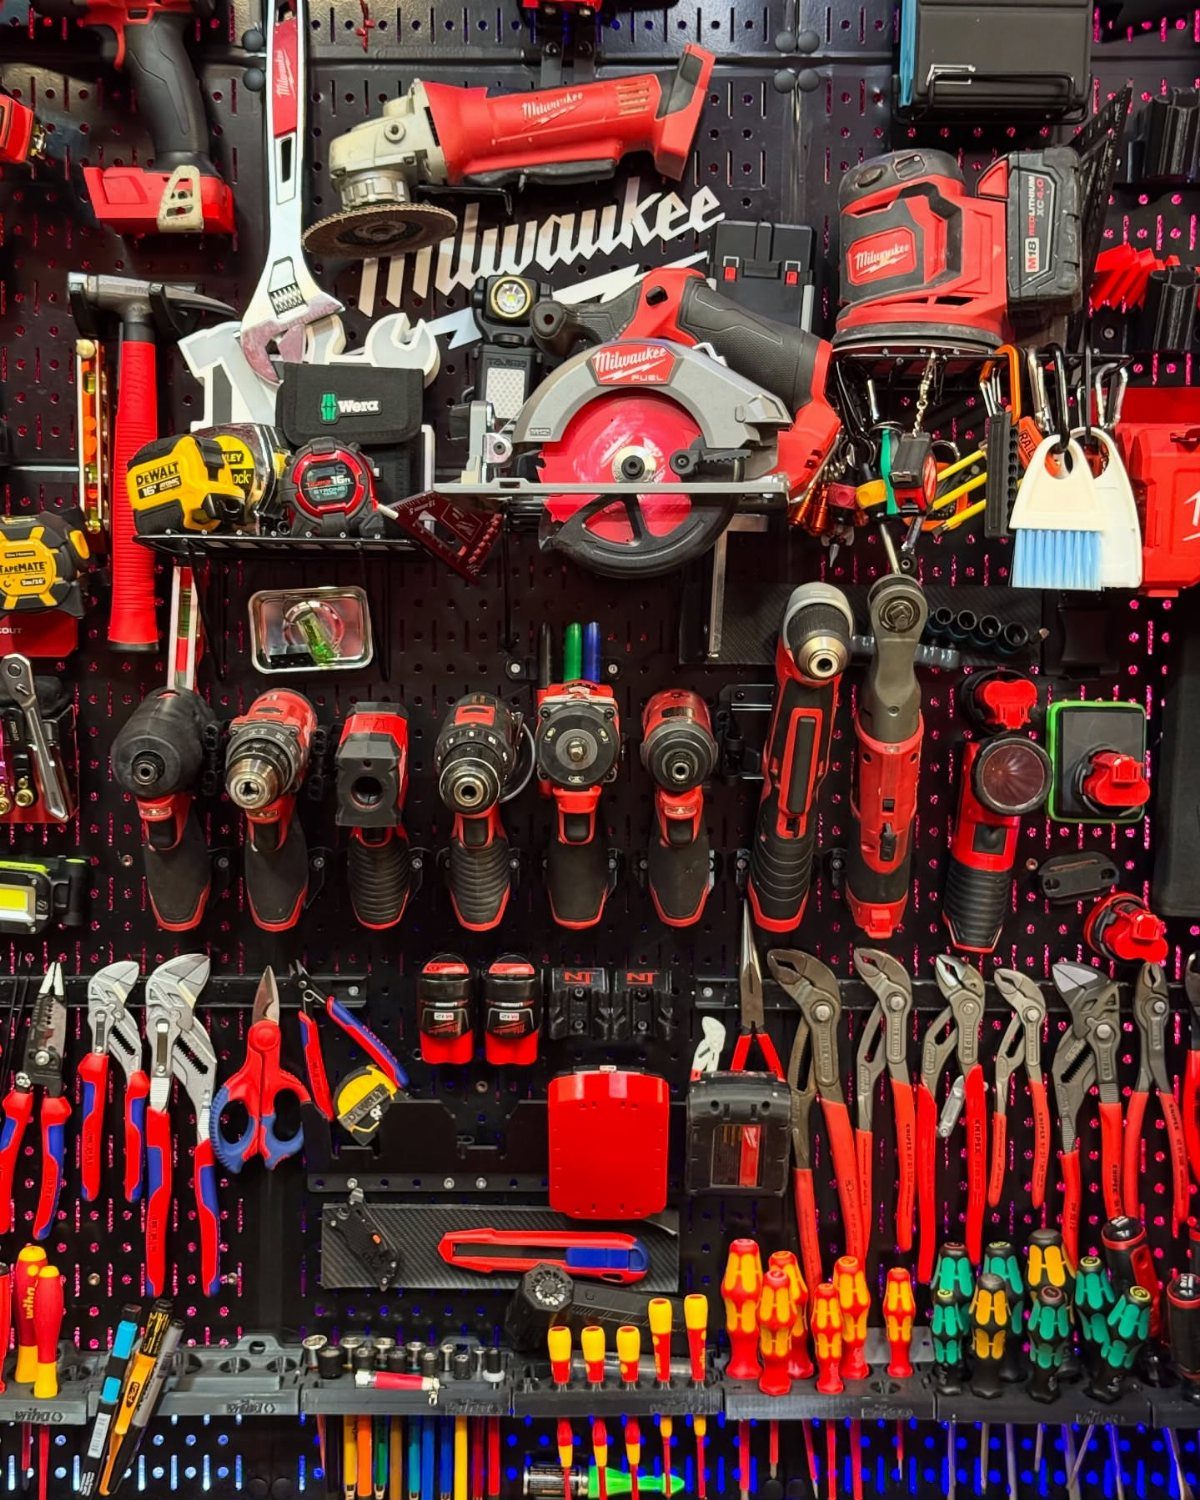
A pegboard wall hands you the freedom to move every holder as your collection changes.
Black slotted board against black hooks keeps the visual noise down; I would pick that over classic gray pegboard every time for a garage that doubles as workspace.
Check the spacing before you buy.
Slotted pegboard uses different hardware than standard perforated board, and mixing the 2 leaves you with holes that do nothing. Mount it to studs or a solid backer; tool weight adds up fast.
Pegboards are perhaps the most versatile garage storage system, offering quick and easy access to frequently used tools and accessories. Installations behind a workbench, lining an entire wall, or customized with hooks, shelves, and bins to suit storage needs work beautifully with this kit.
— Bob Vila

Wall Control metal pegboard is more than 10 times stronger than conventional pegboard

More secure tool board hook engagement over conventional peg board pegs

Built Exclusively for Wall Control Pegboards. Engineered only for Wall Control’s slotted metal tool boards, these hooks lock securely into place and will not work with traditional round-hole pegboard. Designed for a precision fit and maximum holding strength.
2. Wall-mounted Racks
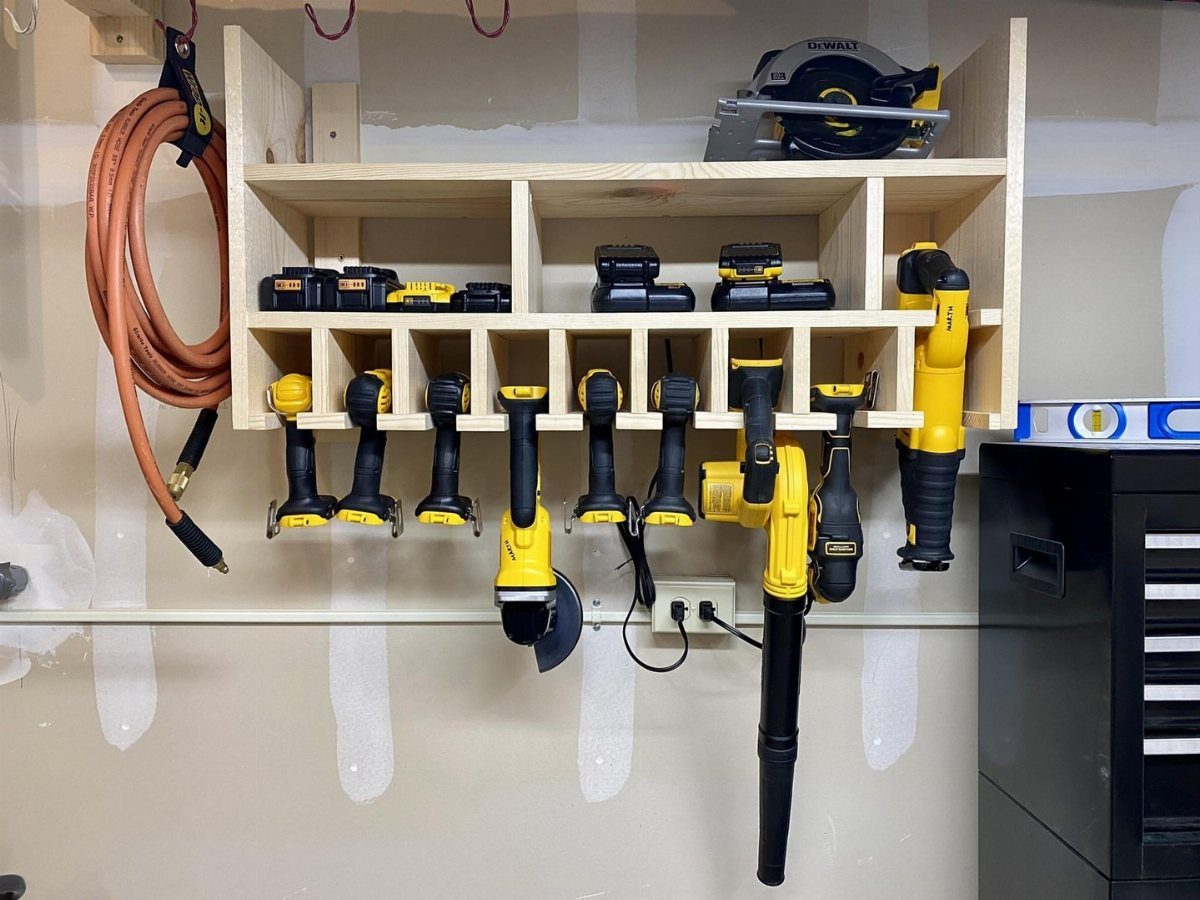
Wall-mounted racks suit renters who cannot commit to a full system.
A wooden rail that holds gear with chargers tucked on a shelf above is the detail that makes it work: batteries live where cords do not dangle into the tool slots.
I would look for a rack with a deep shelf, deep enough to hold chargers and batteries without them teetering or cords spilling.
Anything shallower and chargers overhang or fall. Check that the mounting holes line up with standard stud spacing; adapters for wider centers are rare in wood kits.

【SORT GARAGE SCREWS EASILY: V1 & V2 Combo Pack】 Features a mixed setup of 8 Micro V1 bins (5.4"x4.1"x3.1") and 6 Large V2 bins (7.9"x5.1"x4.3"). The ultimate modular wall matrix to sort, classify, and instantly organize garage screws, nuts, bolts, tool batteries, and small hardware.

OPTIMIZE YOUR SPACE: garden tool organizer compact design helps you maximize space. Hang tools and equipment to free up valuable floor space in garages, sheds, gardens, and more

4-Outlet Power Strip:This garage shelf wall mount features an integrated 4-outlet power strip with a 6.5-foot cord for easy charging. Charge your tools directly on the shelf without the hassle of searching for outlets. By combining storage and functionality, this tool rack saves space while ensuring your power tools are always ready for use.
3. Mop and Broom Holder
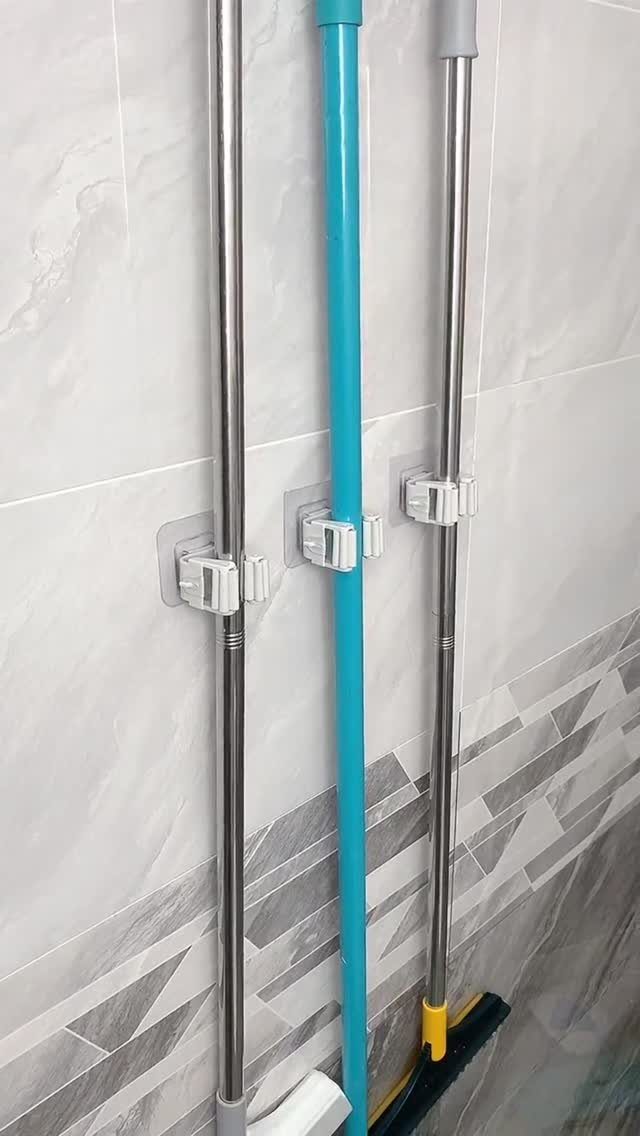
Adhesive wall clamps keep floor space clear without a single screw. The adhesive backing on these holders needs a smooth, non-porous surface to last; tile works, painted drywall may not.
I would skip these for unfinished garage walls and use them inside on utility room tile, or on painted drywall if you find a stud or use a toggle anchor rated for the load.
Weight limits vary by brand, but the clamp style handles standard household poles, not heavy commercial brooms. Press and hold for the full cure time; most failures come from rushing that step.

BROOM AND MOP HOLDER: One package includes six adhesive strips and three Command Broom and Mop Grippers that each holds a broom or mop up to 4 pounds with a 0.8- to 1-inch diameter handle
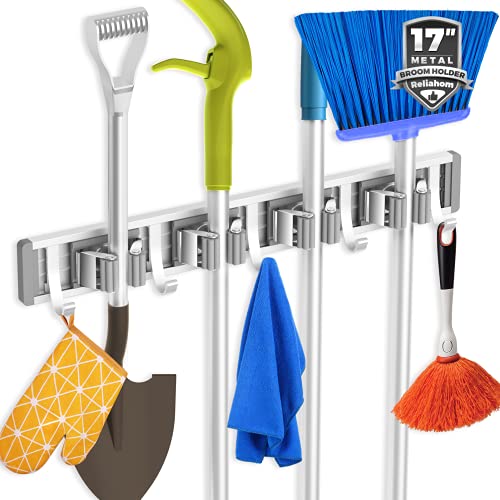
Multi-purpose Wall Mounted Storage Rack - Our Reliahom adjustable wall mounted rack is designed for holding mops, brooms and other cleaning tools. It works as a practical storage solution for home and outdoor organization.

WALL MOUNTED STORAGE TO SAVE FLOOR SPACE. This broom holder wall mount keeps brooms, mops and long handle tools vertically on wall instead of piling messily in corners. As a practical broom and mop organizer wall hanging, the wall broom holder wall mount delivers tidy storage for pantry, garage broom holder wall mount and small utility rooms, eliminating tipping over clutter and maximizing your usable floor area.
4. DEWALT Power Tool Storage Shelf
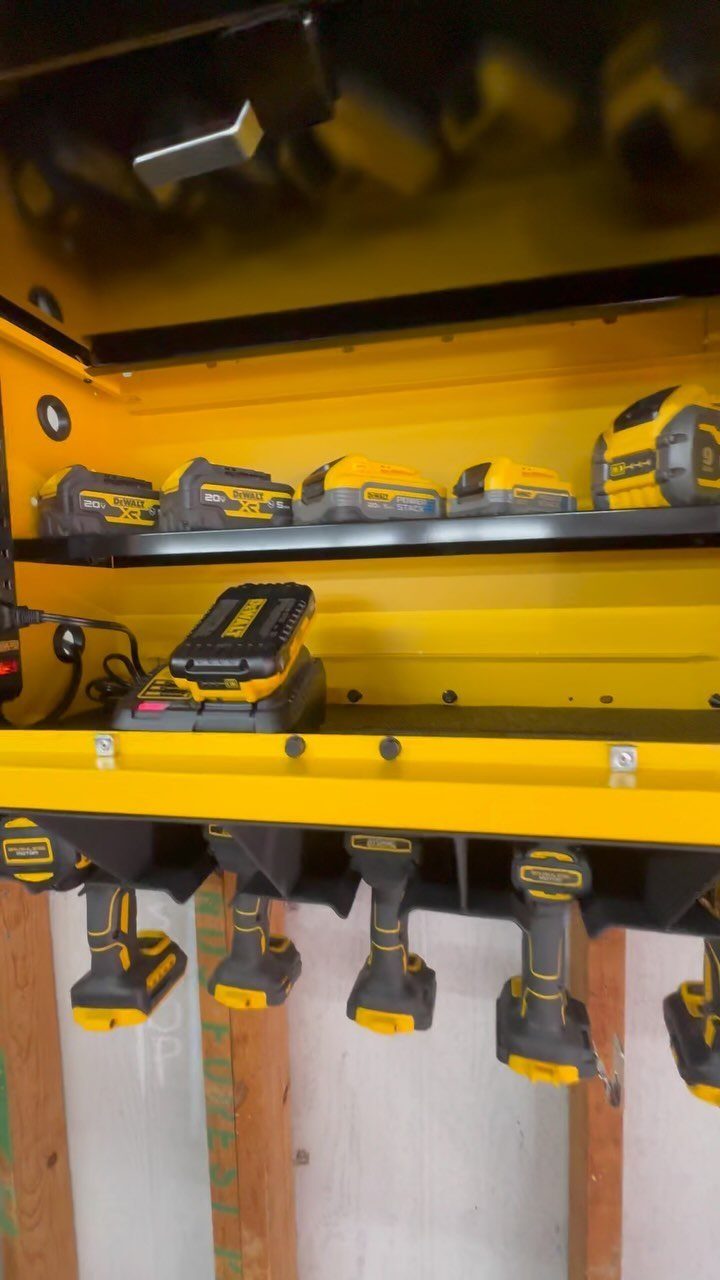
This yellow DeWalt unit combines battery storage with drill hangers in one stamped-metal shelf, and that integration is what you are paying for.
Batteries sit in a top compartment with the charger dock beside them; drills hang inverted from a rail below, ready to grab.
I would check whether my drill belt clips fit that rail width before ordering.
The marking matches DeWalt’s current battery platform, but the shelf itself does not charge batteries; it only stores them. You still need the separate charging dock that comes in the kit or one you already own.

Large power tools and batteries organizer with charging station, and have a single place to live. It doesn't take long to find them, will improve efficiency and come with integrated 8 outlets power strip. Made entirely of metal, strong and durable.

High-Quality Metal Bearing Capacity of 300 Lbs:Our power tool organizer wall mount with charging station is constructed from high-quality and heavy-duty metal materials. The industrial metal has undergone extensive load-bearing tests, allowing it to support up to 330 lbs. You no longer need to worry about the shelf breaking or falling off the wall. Our power tool holders can accommodate power tools of any weight.
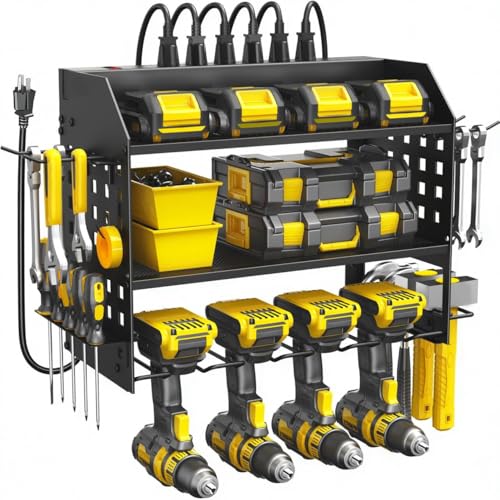
【Integrated 6-Outlet Power Strip】 The power tool organizer features a built-in 6-outlet charging station with a heavy-duty cord, allowing you to charge multiple cordless tool batteries (drills, impact drivers) simultaneously. No more tangled extension cords or searching for available wall sockets in your garage.
5. Modular Wall Storage
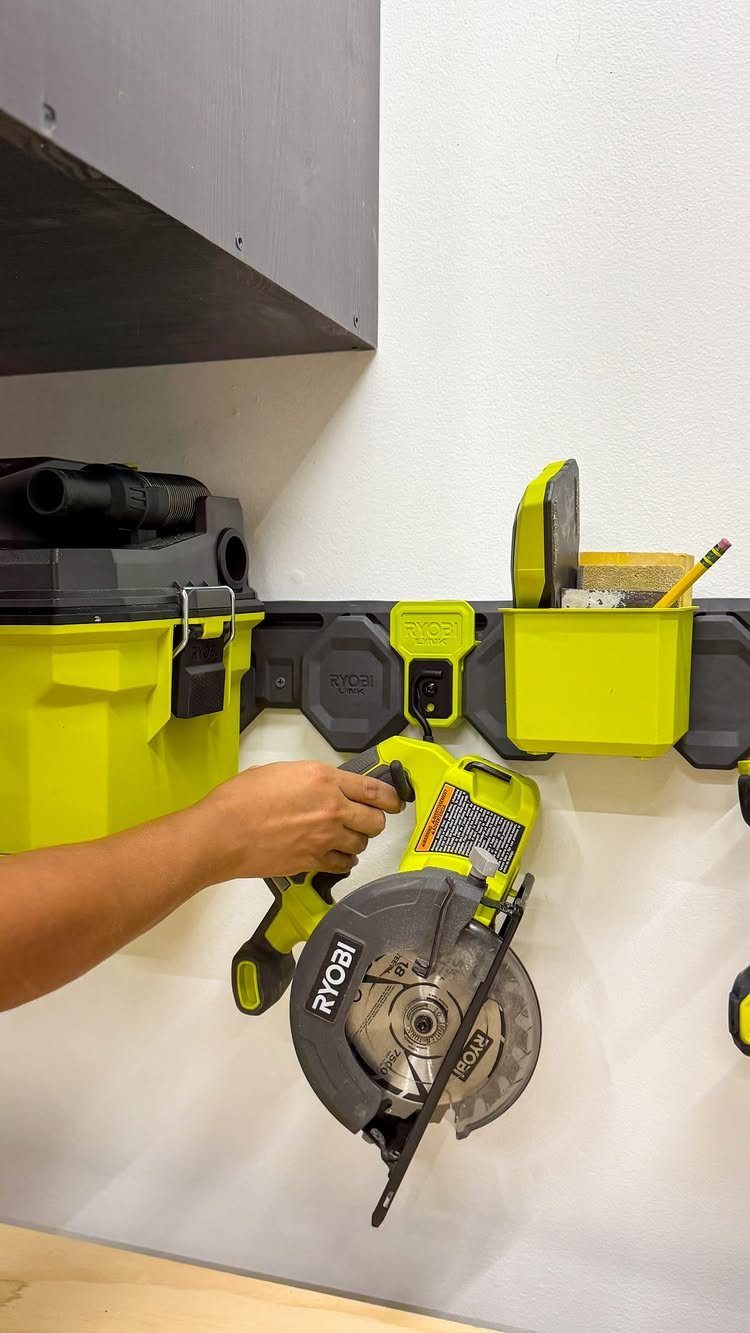
Modular systems grow one piece at a time, which is their real advantage over fixed racks.
A single wall rail accepts tool hangers, bins, shelves, and boxes that lock into the same groove, which matters when your budget spreads across months, not weekends.
Start with one rail and the holders for your three most-used tools. Expansion packs add up fast, so I would map the wall first and leave gaps for later.
The rail mounts to studs or wallboard with toggle bolts; check your spacing before you buy, since rail lengths vary and joints between rails interrupt the lock.

Industrial-Grade Durability: Constructed from industrial-grade PVC, our slatwall garage wall panels are waterproof, moisture-resistant, and easy to clean. With a load-bearing strength three times that of standard wall panels, slatwall panels offer a reliable storage solution for all your tools.

All in One Design Style Design: each slatwall screwdriver holders organizer has ring style slatwall hooks, slat wall tool utility hooks include 3 different types, each slatwall plier holder has 4 ring style slatwall hooks, they can store screwdrivers, pliers, and other daily necessities, suitable for hanging light items and common tools, saving time and space.

Heavy Duty Slatwall Panels: The slat wall panels definitely made with thick and strong PVC material, compared to the traditional plastic wall panel, we have 3 times the load capacity and strength, the tool organizer can withstand the weight of all your tools is the right choice for your tool room.
6. Customizable Setups
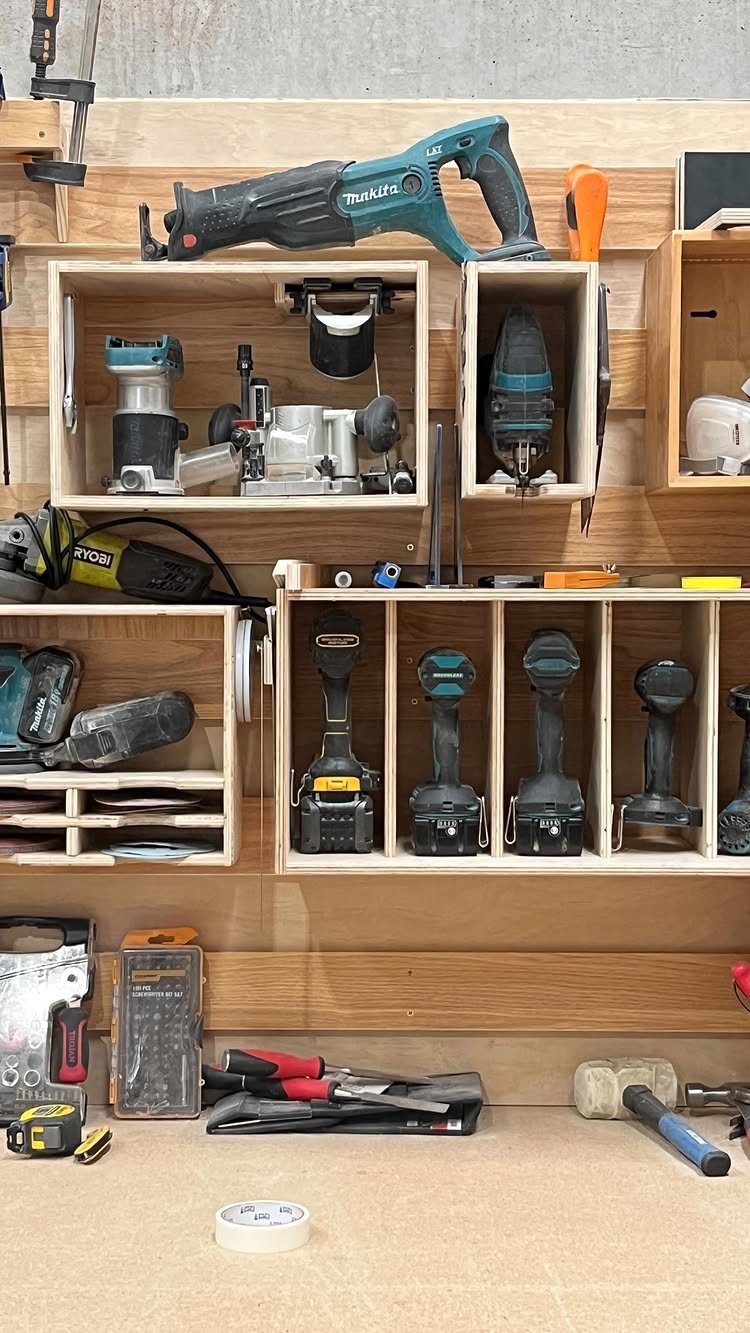
French cleats let you build exactly the cubby each tool needs.
Plywood holders that cradle drills and sanders at angles keep them secure but reachable, and since you make each piece, the spacing fits your workbench height, not a manufacturer’s standard.
I would use thick plywood for the cleat stock; anything thinner splits under load. The wall cleat itself angles upward, and every hanging piece mirrors that cut.
A tablesaw makes quick work of it, but a circular saw with a straightedge guide works if you clamp carefully. Measure your tool footprints before cutting; the cubby that holds a compact router will swallow a full-size drill.

More secure tool board hook engagement over conventional peg board pegs

More secure tool board hook engagement over conventional peg board pegs

More secure tool board hook engagement over conventional peg board pegs
7. Wooden Slatwall Storage System
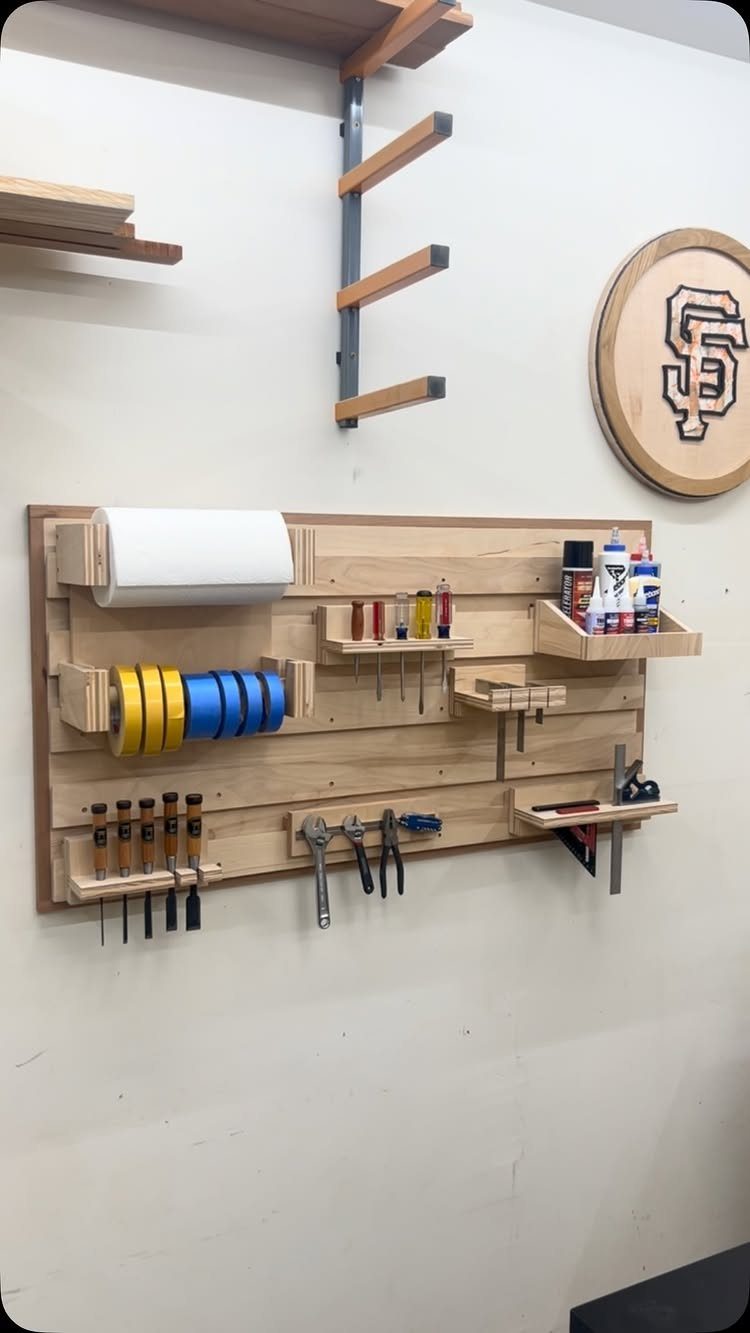
Wooden slatwall reads warmer than metal or plastic channel systems, and that matters in a workshop you actually want to spend time in.
The horizontal slots accept metal or wood hooks, bins, and shelves that slide in and lock by gravity.
I would check slot spacing against the accessories you already own; slatwall channels are not interchangeable across brands.
A 3/4-inch backer board behind the slatwall panel lets you hit studs without exposing their spacing through the front. Leave the wood unfinished if you prefer it to age, or seal it; shop grime soaks into raw grain fast.

LONG-LASTING DURABILITY: Constructed of heavy-duty steel for optimal strength

Sturdy Steel Structure & Large Capacity: Built with heavy-duty steel and reinforced crossbars, this garage organizer is designed to withstand corrosion and daily wear. Its rigid frame delivers stable load-bearing performance up to 400 LBS for long-term use, and fits most common wall surfaces including concrete, brick, pegboard, and wooden walls

Multifunctional Storage Bin: The wall-mount Parts rack designed for storing and organizing tool accessories and small parts, it does not only de-clutters but also keeps the parts safe, Suitable for garage, workshop, Craft Room, Tool Shed
8. Plywood Tool Wall with Custom Mounts
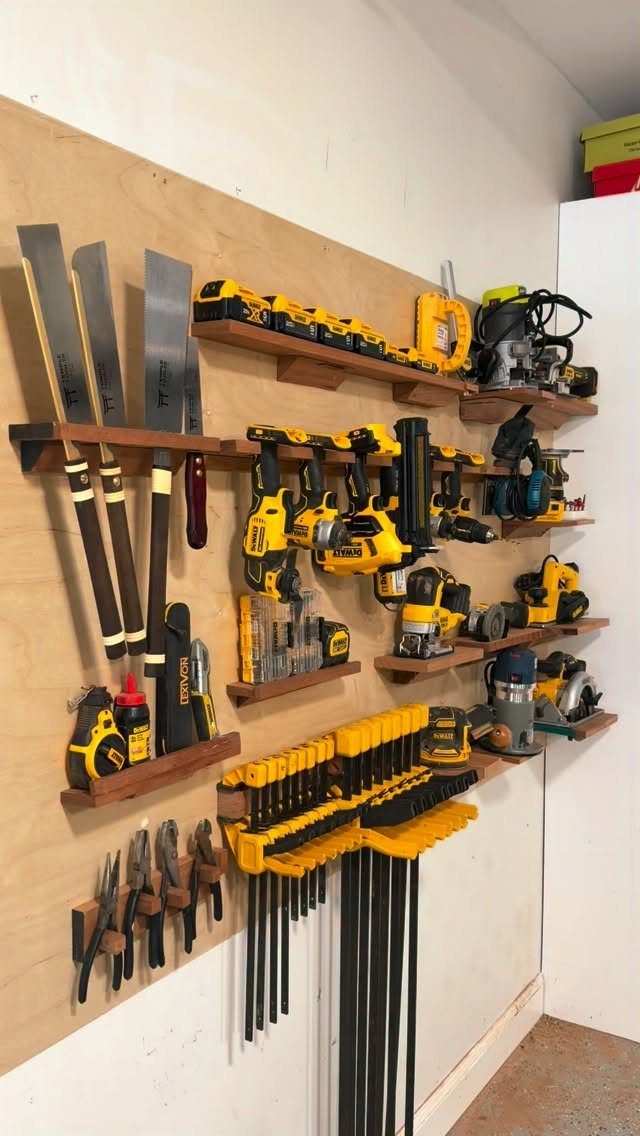
A full plywood sheet on the wall gives you a blank plane to build against.
Custom mounts in darker wood against the lighter sheet create the visible grid; each tool gets a shelf or cradle cut to its outline, not a generic hook that lets it swing.
I would go with plywood thick enough that it does not bow when you press a tool into its mount; the thinner stuff gives too much.
Sketch tool placements before drilling anything; battery packs and handles stick out in directions that collide if you pack them tight.
This setup trades the flexibility of rail systems for stability, and I would choose it for a fixed collection I already know.

[Sturdy & Non-slip] The broom and mop holder wall mount with 5 slots and 4 hooks is made of rust-proof 304 stainless steel, which is beautiful and much more durable than plastic materials, It's non-slip high elasticity clips can holds your broom, mop, umbrella or other garage tools firmly. You can install the tool storage rack with self-adhesive or screws to mount on the wall.

MULTIPLE STORAGE OPTIONS: Features 5 slots and 6 hooks supporting up to 7.5 pounds per slot, perfect for organizing various cleaning tools efficiently
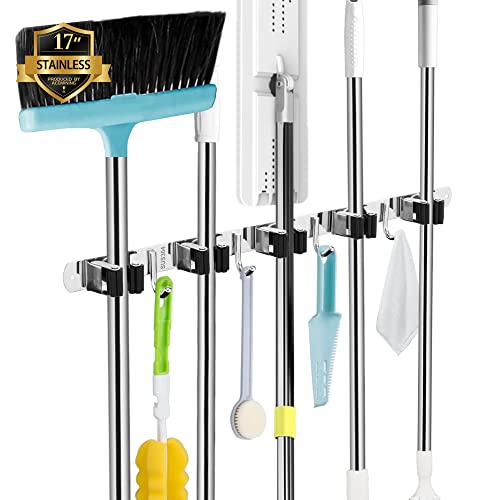
Strongest Hold & Non-slip Design: The broom and mop holder wall mount is made of rustproof 304 stainless steel, more durable than plastic materials, holds items up to 30 lbs when secured with screws (or 8 lbs if secured with self-adhesive). The broom hanger combines with anti-skid silicone, preventing scratches, slots are double rubber gripped to help keep a stronger hold on your items.
Installation Tips
A drill, level, and screwdriver handle most of these installs, and the instructions that come with kits are straightforward enough that I would not call a pro for any of the wall-mounted options here.
The step I see skipped most often is finding studs before the first hole.
A stud finder costs less than a single failed mount, and it saves the patch job when a toggle bolt tears through hollow drywall under a loaded rack.
For systems that need backer boards, plywood at least 3/4 inch thick spreads the load and gives you solid screw purchase even between studs.
Level the first rail or cleat carefully; every piece after it follows that line.
I check with a 4-foot level, not a torpedo level, because the error compounds across a wall. Mark stud centers in pencil and step back to sight the line before drilling.

Power Tool Organizer : This tool storage rack wall mount includes 2 heavy duty shelves, 4 hooks, 1 side bit holder, and built-in 8 AC power outlets. The first layer is equipped with charging station that supports the storage and charging of batteries; the second layer can hold power tools; the third layer can hang 4 cordless drills; the side holder can hang pliers and screwdrivers. The hooks can hang tape measures; the wall-mounted design frees up floor space, solves the problems of tools scattered on the desktop and piled up in corners, and also improves work efficiency

【HEAVY DUTY & DURABLE】:Most 3-tier tool rack on the market weigh only around 7 lbs, but we've upgraded ours to a solid 9.5 lbs by using thicker and stronger metal. This added weight means greater load capacity, improved stability, and longer-lasting durability — ideal for holding power tools without bending or wobbling over time.

【3-in-1 Design】: This battery holder wall mount compatible with Milwaukee 18V batteries; 2 M12-18C/M12-18FC chargers or 1 M18 DFC charger; also can supports hanging your cordless drills. All things in the same place.
Choosing the Right System
A single system rarely covers a full shop. Fixed and flexible, built-in and portable each have their place, and the right mix depends on how permanent your space is and how often your tool collection turns over.
Renters and anyone who moves gear between garage and job site should weight their choice toward the rail and modular options.
French cleats and full plywood sheets commit the wall; they pay off only when the layout stays put for years.
I would map the floor space first, then the wall: a deep workbench needs tools above it, not across the room, and battery chargers want an outlet within cord reach.
The size of your workspace matters less than the rhythm of your work.
A small wall used well beats a full wall of tools you rarely touch. I would start with the 3 tools I reach for every session, store them where my hand falls naturally, and build outward from that habit.

Satisfy Your Changing Demand: you will receive 20 pieces of slat wall hooks in 4/6 inch, 2 pieces slatwall basket, 2 pack black wood slat wall shelves with 4 metal brackets, 3 pieces slat wall bins with holders, 3 pieces slatwall cups with holders and 3 pieces slatwall screwdriver holders, 10 pieces slatwall utility notch hook, total in 43 pieces, enough to meet your using, replacement and sharing needs

SLAT WALL ACCESSORY KIT – includes 35 pieces: 3 slatwall baskets, 3 slatwall bins, 20 multi-type slat wall hooks, 2 wooden slat wall shelves, and more.

[Saves Space]: The slatwall surface features interlocking seamless grooves, allowing you to hang shelves and various tools. This helps you organize and store items, utilize space efficiently, and meet your personalized storage needs, and it can also be cut as needed
Frequently Asked Questions
What is the best tool wall storage system?
The best system depends on whether you rent or own, and how often your tool collection changes. If you rent or take tools to job sites, rail systems are the pick: they pop off clean and travel with you.
French cleats and full plywood backs are permanent installs, so I only spec them when the bench and wall layout are locked in for the long haul.
What is the best way to store tools?
Wall-mounted systems keep floor space free and put tools where your hand falls naturally.