
Pullout drawers in cabinet spaces are sliding shelves mounted on full-extension hardware that bring stored items forward into full view.
They only work if you measure the interior box, not the door opening; I learned that after building a drawer that cleared the frame but jammed against an internal shelf support.
Half-inch plywood bottoms and 1×2 sides keep the build light, while the slides themselves, usually a half-inch per side, are what actually limit your usable width.
Measuring the Cabinet Interior
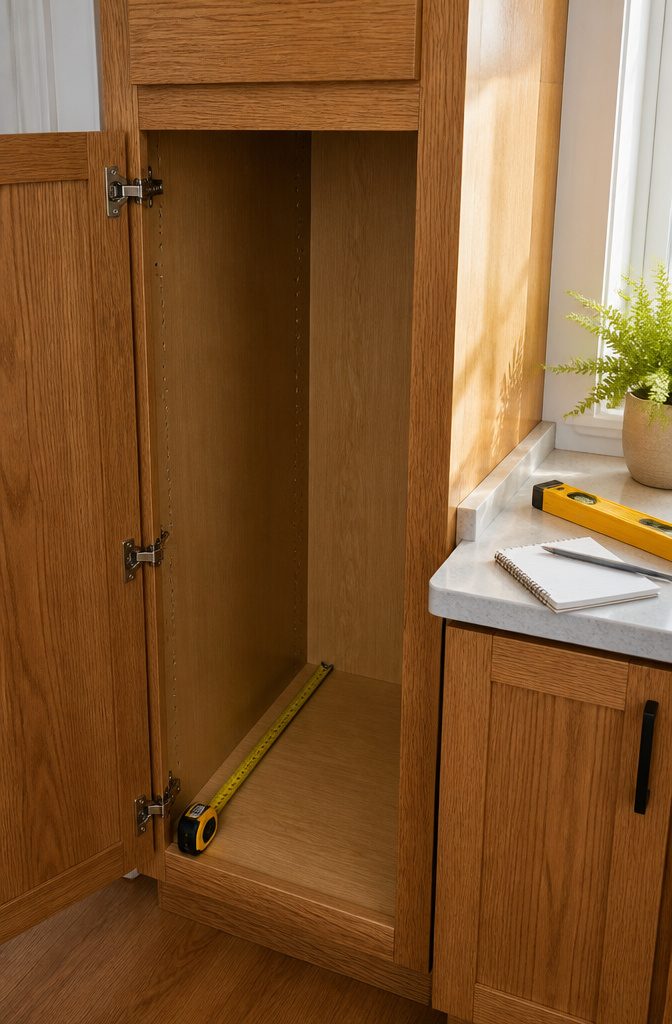
The interior box of your cabinet matters more than the door opening most people measure first.
I learned that the hard way on my first pullout project: a drawer that slid perfectly through the frame but jammed against a shelf support inside.
Measure the full depth, width, and height of the interior box, not just the visible opening, then subtract roughly 1 inch total from the width to account for standard side-mount drawer slides.
Depth typically runs 18–24 inches for base cabinets, though a water line or disposal can steal space you only notice once the shelf is out.
Height is where I think renters get the most flexibility; without a fixed shelf position to work around, you can stack two shorter pullouts where one tall drawer would sit awkwardly.
The 1×2 framing and 1/2 inch plywood most DIY builds use will eat a small fraction of that clearance, but the slide hardware itself, usually a half-inch per side, is what actually limits your drawer width.
Mark your screw holes only after you have confirmed the base sits centered on the shelf with room to move freely on both sides.

IMPORTANT NOTICE: Our cabinet pull out shelves are not suitable for cabinets with lips.Before ordering, please measure your cabinet dimensions correctly using the method shown in the picture.If your deep cabinet has a lip, please choose from our other drawers options designed for cabinets with a lip available in the store

IMPORTANT NOTICE:Our cabinet pull out shelves are not suitable for cabinets with lips.Before ordering,please measure your cabinet dimensions correctly using the method shown in the picture.If your deep cabinet has a lip,please choose from our other drawers options designed for cabinets with a lip available in the store

Fits Most Cabinets – Prevent Misfit Returns: Ensure your cabinet’s internal width exceeds 16"" and depth exceeds 21"" (excluding hinges, pipes, or other obstructions). The actual usable drawer space is slightly smaller than the exterior dimensions to ensure proper installation and function.
Removing Shelves and Obstacles

Half-shelves waste the exact depth pullout drawers are meant to reclaim, so removing them comes first.
A multi-tool with a flush-cut blade handles the job in most standard cabinets. Work slowly, support the shelf from below so it does not splinter the cabinet wall on the way down, and wear eye protection; laminate chips fly unpredictably.
Fixed shelves are a harder stop.
If a shelf is dadoed or glued into the cabinet sides, cutting it out risks the cabinet box itself. In that case, the workable zone sits entirely below or above the fixed shelf, not through it.
Measure the clear opening height and build your pullout drawer stack to fit that single bay rather than forcing a full-height solution that compromises the cabinet structure.
A 12-inch drawer in a usable 14-inch bay beats a drawer that binds against a shelf you should have left alone.
Once the old shelves are out, vacuum the corners and wipe the interior walls.
Sawdust left behind works its way into drawer slides and grits up the bearings over the first hundred cycles. Clean now, or listen to the grind later.

[Choose The Size Wisely] To ensure you select the correct size for your dresser drawer slides, measure the depth of your drawer and make sure there is an extra 0.5 inches of space on both sides for mounting. These slides are suitable for drawer depths ranging from (depth range)

[Choose The Size Wisely] To ensure you select the correct size for your dresser drawer slides, measure the depth of your drawer and make sure there is an extra 0.5 inches of space on both sides for mounting. These slides are suitable for drawer depths ranging from (depth range)

1 Kit Includes 1 pair of drawer slides + 1L & 1R locking devices + 2 rear mounting brackets + screws; Compatible with face frame and frameless cabinets
Installing Drawer Slides
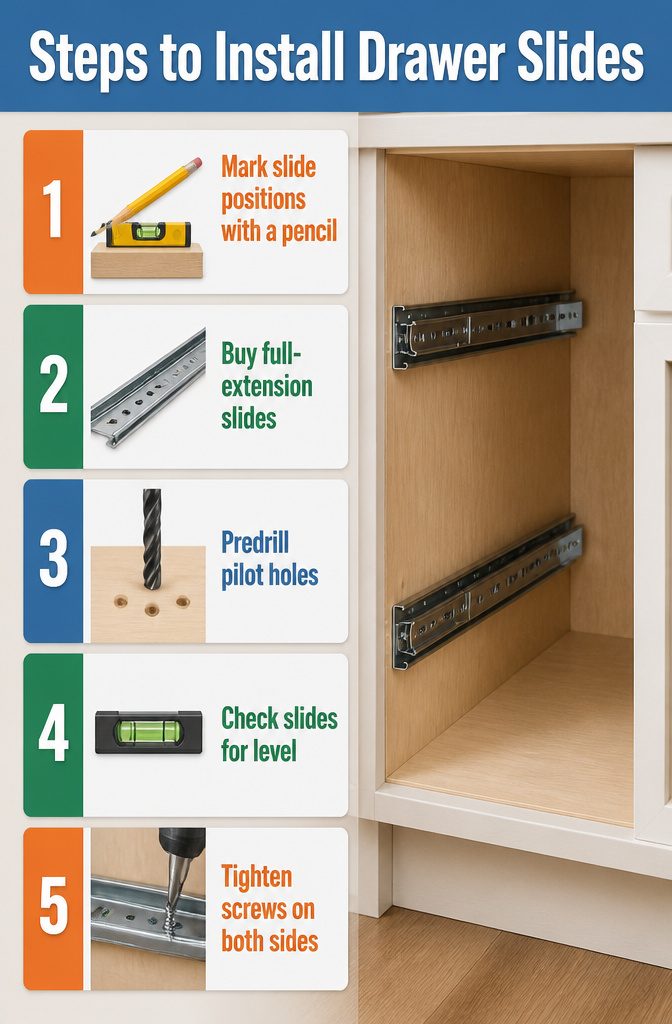
- Mark the slide positions inside the cabinet with a pencil, measuring from the floor or shelf up to the height you want the drawer to sit. I keep a short level and a couple of scrap wood blocks cut to the same length nearby; the blocks act as spacers so the left and right slides land at identical heights without me measuring twice and guessing.
- Full-extension slides are the ones to buy here; anything shorter leaves the back third of the drawer buried in the cabinet, which defeats the point of a pullout. Predrill pilot holes at each marked screw location using a bit sized to your screws, then set the slide against the cabinet wall and drive the screws. The predrilling matters more than it looks like it does; hardwood cabinet sides will split, and even plywood threads strip when you crank a screw straight in dry.
- Check that the pair of slides is dead level and parallel before you tighten the second screw on either side. A drawer that binds or rattle-slides is almost always riding on one slide pitched up or down a few degrees. I sight across the front opening, or run a straight scrap of wood from one slide to the other to feel for a mismatch. Fix it now; once the drawer box is built, the error is locked in and the only cure is new holes.

【Heavy Duty 100 lb Capacity】 BAIDICE full extension drawer slides are built with 1.0mm cold-rolled steel and dual industrial-grade ball bearings, supporting up to 100 lbs—40 lbs more than standard slides. The precision ball bearing mechanism ensures smooth gliding even under heavy loads, while the built-in rubber crash pad keeps operation as quiet as 35 decibels.
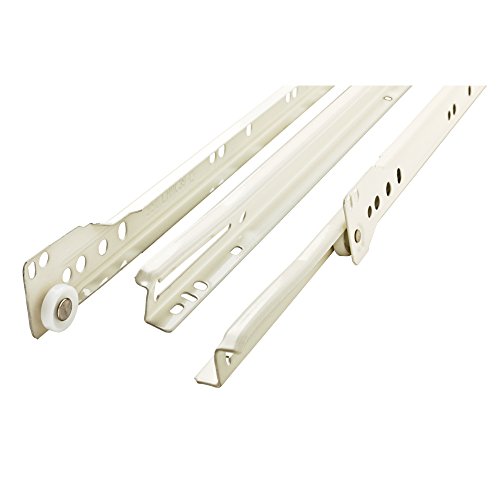
Made from stamped steel with a white epoxy finish

【Heavy Duty & Anti-Rust Construction】Crafted from high-grade cold-rolled steel with a professional zinc-plated finish. These drawer slides offer superior oxidation resistance and long-lasting durability. Rated for heavy-duty use with a load capacity of up to 100 lbs, perfect for both home renovation and industrial projects
Building the Drawers

Half-inch plywood is what I reach for when building pullout drawers in cabinet openings, paired with 1×2s for the frame.
The plywood gives you a flat, stable bottom without the weight of three-quarter stock, and the 1×2s keep the sides light enough that the slides don’t strain.
Cut your pieces after the slides are mounted so you can measure the actual opening width, then subtract the combined thickness of both slides plus a sixteenth for clearance.
Depth matters too: the drawer front needs to sit behind the cabinet door, not flush with it, or you’ll fight the door frame every time you close up.
The same gap keeps you clear of hinges that swing into the box.
Assembly is straightforward glue and brads, or finishing nails if that’s what you own.
I set the bottom panel into grooves cut in the 1×2 sides when I have a table saw handy; otherwise I just glue and nail the bottom to the sides and add a second nail near each corner for racking resistance.
Square the box as the glue sets, checking diagonals with a tape measure. A drawer that starts out of square never slides right, no matter how good your hardware is.

【L-SHAPED DESIGN FITS AROUND PIPES AND GARBAGE DISPOSALS】 The narrow top basket mounts left or right to clear your plumbing. The wide lower tier reclaims full vertical space under the sink, turning a blocked corner into organized, easy-to-use cabinet storage

SPACE SAVING ORGANIZER: Slide out cabinet organizer for base cabinets in your kitchen, pantry, bathroom, or laundry room to make your items easier to access

MEASURE BEFORE PURCHASE – Measure width before ordering, measure the usable opening between hinges. Designed for cabinets with a minimum front opening width of 11 in and an interior depth of at least 18.5 in. This 10.5 in W x 18 in D x 16 in H 2-tier pull out cabinet organizer fits kitchen base cabinets, pantry cabinets, bathroom vanities, and laundry room cabinets.
Attaching and Inserting Drawers

Attaching the slide hardware to the drawer box itself is where small errors become daily annoyances.
I set each drawer on a flat surface with spacer blocks underneath so the box sits level while I work, then measure carefully to mount both slides at identical heights.
Even a 1/8-inch difference means the drawer will list to one side or refuse to glide smoothly.
Once the slides are secured to the drawer sides, I line the drawer up with the cabinet-mounted halves and push it straight in.
The first insertion tells me everything: if it resists, I pull it back out and check for twist in the box or a slide sitting slightly proud of the surface.
Most binding comes from one of those two faults, not from the hardware itself.
I run each drawer through ten or twelve full cycles, pulling it completely out and pressing it home.
If it does not glide with one finger and sit dead level when closed, I loosen the screws, tap the slide into true, and test again.
A drawer that needs a shove to close will stay half-open for the next five years; ten minutes of adjustment now fixes that permanently.

FLEXIBLE BOTTOM OR SIDE MOUNT INSTALLATION: Designed for both bottom-mount and side-mount installation to fit different cabinet layouts and storage needs. Drawer size measures 14" W × 21" D × 6.2" H, with total installed width of 15".

Important Measurement Reminder: Please ensure your cabinet’s internal width exceeds 13" and depth exceeds 21", excluding hinges, pipes, or obstructions. Note the usable drawer space is slightly smaller than the listed exterior dimensions.

LARGE CAPACITY & 5-LAYER DESIGN: Features 3 smooth-sliding drawers, a top compartment with 4 grid sections, a pull-out ring roll tray, and 2 side doors for maximum jewelry storage.
Single-Height and Double-Height Pull-Out Shelves

Single-height pull-out shelves sit flush with one standard cabinet shelf, which makes them the right choice for stacking plates, mixing bowls, or anything with a low center of gravity.
The shallow sides keep contents visible from above, so you spot what you need without pulling the whole unit forward. I would use these anywhere I reach for the same item daily, like a coffee station or a prep zone.
Double-height shelves raise the front and side walls to roughly the height of a cereal box, and that extra lip matters more than I expected when I first looked at hardware.
Taller sides keep bottles and boxes from tipping when the shelf glides out, which is why I would pick this style for pantry cabinets holding oils, vinegars, or tall cleaning supplies.
Weight is the real concern: double-height sides add material, so the slide hardware needs a higher load rating to move smoothly, and I would not load one to its limit on a soft-close glide unless I wanted to feel it lag on the return.
What you store decides the choice, not the cabinet size. Double-height shelves win for anything that stands up and could fall; single-height shelves win for anything that lies flat and needs no guard.
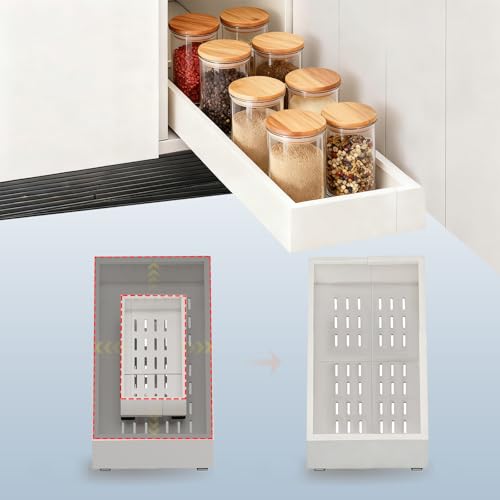
IMPORTANT NOTICE:Our cabinet pull out shelves are not suitable for cabinets with lips.Before ordering,please measure your cabinet dimensions correctly using the method shown in the picture.If your cabinet has a lip,please choose from our other drawers options designed for cabinets with a lip available in the store

【Raising Pads For Framed Cabinets】Equipped with innovative raising pads, this pull out cabinet organizer ensures compatibility with both framed and frameless cabinets. Enjoy hassle-free installation without compromising on functionality or design. Note: Compatible with Framed Cabinets with Edge Heights up to 0.8 Inches.

LYNK PROFESSIONAL, THERE IS NO SUBSTITUTE! TURN BINS OF YOUR CHOICE INTO EASY ACCESS SLIDE OUT ORGANIZERS for kitchen, pantry, bathroom, and laundry room cabinets
Triple-Height and Tray Bin-Height Drawers

Triple-height pullout drawers are built for weight. Most carry about 100 pounds, and heavy-duty versions go to 200 pounds, which is where I would put the stand mixer, the stockpot collection, or the blender nobody wants to lift down from overhead.
The sides run taller than standard, so nothing tips on the way out, and the full extension matters more here because the back of a deep cabinet is already hard to reach without adding twenty pounds of cast iron to the problem.
Tray bin-height drawers split the difference. They sit lower, usually with dividers and grooves meant for cutting boards, cookie sheets, and serving platters, the pieces that always end up vertical and sliding around.
I would use these for anything flat and awkward rather than heavy. A full sheet pan does not weigh much, but it is useless when it is buried under three lids and a roasting rack.
Between the two, the choice is what you actually own.
Tall, heavy hardware goes in the triple-height. Flat, fragile items that need to stay upright belong in the tray bin.
If you are short on cabinet height, the tray bin wins because it demands less vertical clearance and still gives you the dividers that keep boards from warping against each other.

Effortless Soft-Close & Full Drawer Access: The hydraulic damper features to slowly closed the drawer without slamming shut or noice. With full extension, you'll have complete access to the entire drawer, making organization and retrieval of items quick and hassle-free.
[Choose The Size Wisely] To ensure you select the correct size for your dresser drawer slides, measure the depth of your drawer and make sure there is an extra 0.5 inches of space on both sides for mounting. These slides are suitable for drawer depths ranging from (depth range)

Direct Replacement for Worn or Broken Slides: Designed as a perfect, hassle-free replacement for your existing drawer slides. The common industry dimensions and standard sizing make swapping out old, damaged slides straightforward, restoring smooth drawer operation immediately
Drawer-in-a-Drawer and File Box Pull-Outs

Stackable drawer-in-a-drawer units fit inside an existing cabinet drawer to double the vertical storage without changing the cabinet box itself. The top tier slides back on a rail system when you open it, revealing the larger space beneath.
I would use these for silverware or spice packets that otherwise float around in deep drawers, though the upper tray reduces the headroom for tall items below.
Custom file box pull-outs serve a narrower purpose: hanging folders or document trays that ride out on standard drawer slides.
The cabinet depth sets the limit; a 24-inch-deep base cabinet takes a legal-size box with room for the slide hardware, while an 18-inch wall cabinet only works for letter.
I would skip the file pull-out in a kitchen and put it in a home office or utility closet instead, where paper storage actually belongs.
The hardware costs about the same as a standard pull-out, but the specialized box itself adds $40–$80 over a plain shelf.

Package Included: 4 x 14 Inch Drawer Tracks for 1 drawer, 3.6*16mm mounting screws for installation. Please make sure you double check the type and dimensions before purchase.

Direct Replacement for Worn or Broken Slides: Designed as a perfect, hassle-free replacement for your existing drawer slides. The common industry dimensions and standard sizing make swapping out old, damaged slides straightforward, restoring smooth drawer operation immediately

📏 INSTALLATION NOTES — Slide Length:12"(300mm)📐. Fully Extended length:24"(600mm)🚀. Quantity: 1 pair(2 pieces)🧩. Installation clearance: 0.5"(Each)⚡. Suitable for drawers with an internal depth of ≥ 13"-15"📏. The space between drawer and cabinet wall need to be 0.5in each at left and right side,total 1in ( inside cabinet width - outside drawer width= 1in )⚖️, Mounting screws included🔩
What Pull-Out Drawers Cost
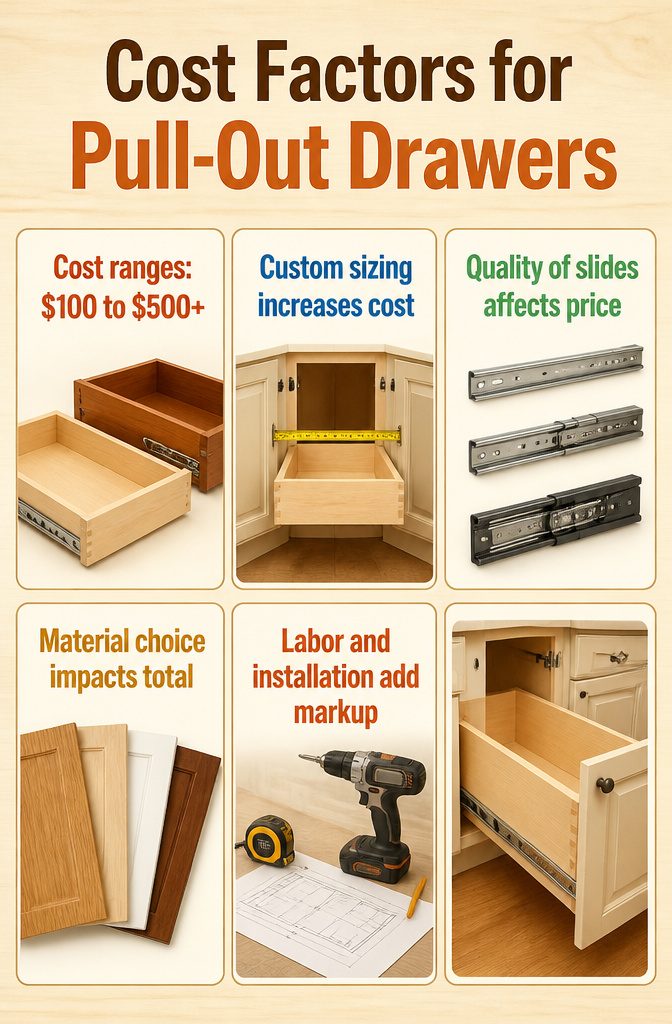
A single custom pull-out drawer can run anywhere from a low three figures to well over five, and the gap comes down to four things that stack fast: whether the box is built to your exact cabinet dimensions, how many slides you are adding, the wood or laminate finish you choose, and the depth and width of each unit.
I have seen quotes where doubling the drawer depth added more to the total than the hardware itself.
The custom work is what swings the price most. A pre-sized unit that you shim into a standard 24-inch base cabinet costs far less than a box cut to fit an oddball corner cabinet from the 1970s.
Soft-close slides add a modest bump; full-extension, heavy-duty slides with a hundred-pound rating add more. Oak or maple fronts run above painted MDF almost every time, and a stained interior matching your existing cabinetry pushes it higher still.
I would not ask for a detailed line-item breakdown from every vendor.
Too many pull-out projects mix labor, materials, and hardware into a single quote, and the ones that do itemize often bury markup in "installation" that covers three hours of measuring and adjusting on site.
What I do ask is which of those four factors, custom sizing or finish or slide quality or count, is driving the number I am seeing. That is the lever you can actually pull if the first quote stings.

[🔝 WARM TIPS]: Please note that this pull out cabinet organizer suitable for cabinets with internal width exceeding 13" and depth exceeding 21". This pull out drawer for cabinets with Upgraded Raising Pads are compatible with both frameless cabinets and framed cabinets with edge heights up to 0.4 inches. It is essential to carefully measure your cabinet's dimensions before installation to ensure compatibility.

LYNK PROFESSIONAL, THERE IS NO SUBSTITUTE! MAKE YOUR LIFE EASIER WHILE FEELING LIKE A PROFESSIONAL COOK with all those cutting boards, tall trays, and baking sheets at your fingertips in our innovative space saving storage rack, only 10 inches wide!

▲WARM REMINDER: This drawer is only suitable for cabinets with a width exceeding 13" and a depth exceeding 18". Please confirm the dimensions of your cabinet before selecting the drawer
Installation Time and Materials
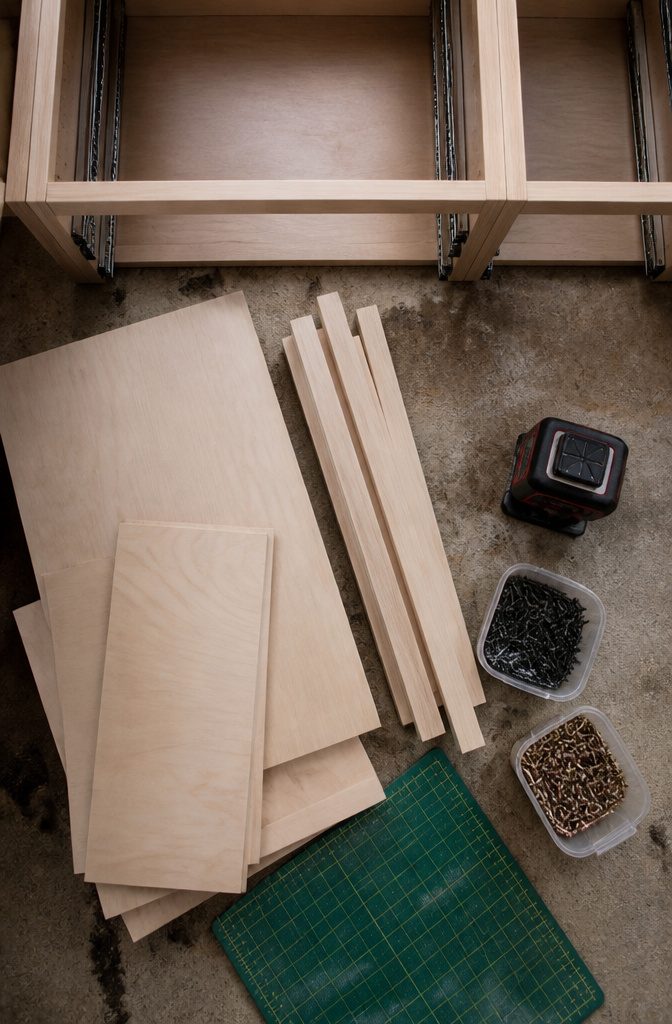
Most installations finish in a single afternoon, which is why I think of this as a true weekend project rather than a multi-day commitment.
The materials are straightforward: 1/2 inch plywood for the drawer bottoms and 1x2s for the sides, plus full-extension drawer slides, wood glue, and a brad nailer or hammer with nails.
A multi-tool helps if you need to remove existing shelves, and a laser level keeps the slide alignment honest.
Spacer blocks speed up consistent spacing between drawers. I would skip the soft-close upgrade unless the budget already has room for it; standard slides work fine for pantry or utility storage.
Sandpaper and a sander round out the list, though hand-sanding works if you already own the paper. Scrap plywood and 1x2s from earlier projects cut the cost to nearly hardware alone, so I always check the scrap pile first.

FULLY CUSTOM DRAWER BOX SIZE: Built to your exact width, depth and height in 1/32 in increments for side mount or undermount slides, frameless or face frame. Send your cabinet opening measurements and we cut the box to fit.

【Check Cabinet Size Before Purchase】This black under cabinet trash can pull out measures 14.5"W x 21.6"D x 10.6"H and fits double kitchen trash can bins (each ≤ 9 gallons). Minimum cabinet size required: 16"W x 23"D x 12"H. Please measure carefully before purchase and check for hinges, pipes, or shelves to ensure proper installation.

Large Storage Space: Overall Size: 19.7"W x 29"H x 15.7"D. Cutout Size: 17.5"W x 26.7"H x 19.3"D. Our trash drawer is simple to assemble and provides spacious storage space for you to hold a lot of kitchen trash at one time. You will have a clean and neat kitchen.
Why Pull-Out Drawers Matter

Deep cabinets with half-shelves waste space by design; pullout drawers recover up to 50% more usable storage by bringing every item forward into reach. I would skip the full remodel and start here because the fix is mechanical, not structural.
A fixed shelf forces you to kneel and reach, which means the back third of the cabinet fills with things you forget you own. A pullout drawer slides the entire contents out to where you can see them.
The clutter reduction is secondary but real.
When I can see what I have, I stop buying duplicates. The cleaning advantage matters too; a fixed shelf collects crumbs and spills you cannot reach, while a pullout lets you wipe the whole surface in one motion.
Custom sizing is available, though I would measure twice and order once since returns on cut-to-fit hardware are a headache.
For renters and first-home owners, this is the upgrade that reads custom without the custom price. The kitchen feels finished because nothing is stranded in the dark at the back of a cabinet.
Frequently Asked Questions
How much do pullout drawers in cabinet cost?
A single custom pullout drawer runs from low three figures to over $500, with price driven by four things: custom sizing to your exact cabinet dimensions, how many drawers you add, the wood or laminate finish, and the depth and width of each unit.
Doubling the drawer depth can add more to the total than the hardware itself. Pre-sized units for standard 24-inch base cabinets cost far less than boxes cut to fit oddball corner cabinets.
What are pullout drawers in cabinet?
Pullout drawers in cabinet are custom fixtures that fit inside existing cabinets to bring stored items forward into reach on sliding hardware.
They replace fixed shelves with rolling platforms or boxes that glide out on full-extension drawer slides, recovering up to 50% more usable storage in deep base cabinets by eliminating the dead space at the back.
How long does it take to install pullout drawers in cabinet?
Most installations finish in a single afternoon, making this a true weekend project rather than a multi-day commitment.
That timeline assumes you have already removed any existing shelves and obstacles, measured carefully, and have materials on hand: 1/2 inch plywood, 1x2s, drawer slides, glue, and basic cutting tools.
Can you add pullout drawers to existing cabinets?
Yes, and that is exactly what most pullout drawer projects involve. You remove existing half-shelves with a multi-tool, clean the interior thoroughly, mount full-extension slides to the cabinet walls, and build drawer boxes to fit the opening.
The cabinet box itself stays intact; the upgrade is mechanical, not structural. Fixed shelves that are dadoed or glued in place limit you to the clear bay above or below them.
What is the best cabinet pullout drawer?
The best pullout drawer depends on what you store, not on a single universal design.
Single-height shelves work for flat items like plates and mixing bowls; double-height shelves with taller sides keep bottles and boxes from tipping; triple-height drawers handle heavy stand mixers and cast iron up to 100–200 pounds; tray bin-height drawers with dividers organize cutting boards and sheet pans upright.
Match the drawer height and load rating to your actual contents.
What is the 1/3 rule for cabinet pulls?
This question refers to hardware placement for cabinet door and drawer front pulls and handles, not to pullout drawers inside cabinets. For guidance on where to mount external cabinet pulls, consult a cabinet hardware sizing guide.